Mounting a weapon light isn’t about looking “tactical.” It’s about getting usable light exactly where your support hand naturally works—so you can identify what you’re seeing without fighting glare, shadows, or awkward switches.
Safety Note (Short and Real)
Before we talk setup: follow firearm safety rules, follow the light manufacturer’s instructions, and only test beam patterns with an unloaded firearm in a safe direction. Streamlight’s instruction documents include safety warnings and handling notes that are worth reading before installation.
Why Mounting Position Matters More Than People Think
A weapon light can be an excellent model and still feel “wrong” if it’s mounted in the wrong place.
When placement is off, a few things usually happen:
-
Your thumb can’t reach the switch naturally
-
Your sling or barricade bumps the light and changes your aim
-
The beam creates weird shadows from the barrel or muzzle device
-
Indoors, light splashes back into your face off white walls
In other words, the mount position isn’t cosmetic—it’s functional.
The 3 Rules of a Good AR-15 Flashlight Mount
1) Put the light where your support hand can run it under stress
If you have to “hunt” for the switch, you will miss it when adrenaline hits.
2) Mount it as far forward as practical—without letting the muzzle device beat it up
Most mounting guides agree that forward placement reduces shadowing and keeps your grip consistent. However, “forward” still has to be practical for blast and heat.
3) Reduce snag hazards
A light that sticks out too far becomes a doorframe magnet. That’s exactly why offset mounts exist.
The Clock System (So We’re Speaking the Same Language)
Imagine looking at your rifle from the rear:
-
12 o’clock = top rail
-
3 o’clock = right side
-
9 o’clock = left side
-
6 o’clock = bottom
Offset positions:
-
1 o’clock = top-right
-
11 o’clock = top-left
This “clock” language is commonly used across AR accessory guides and makes it easy to talk about setups without confusion.
Best AR-15 Flashlight Mount Positions
11 o’clock / 1 o’clock (Offset Mount) — Best All-Around for Most Shooters
Offset mounting at 11 or 1 is popular because it balances:
-
easy activation
-
reduced snag risk
-
cleaner indoor beam behavior
Many modern offset mounts are designed specifically for 11/1 placement, because it’s a sweet spot for real use.
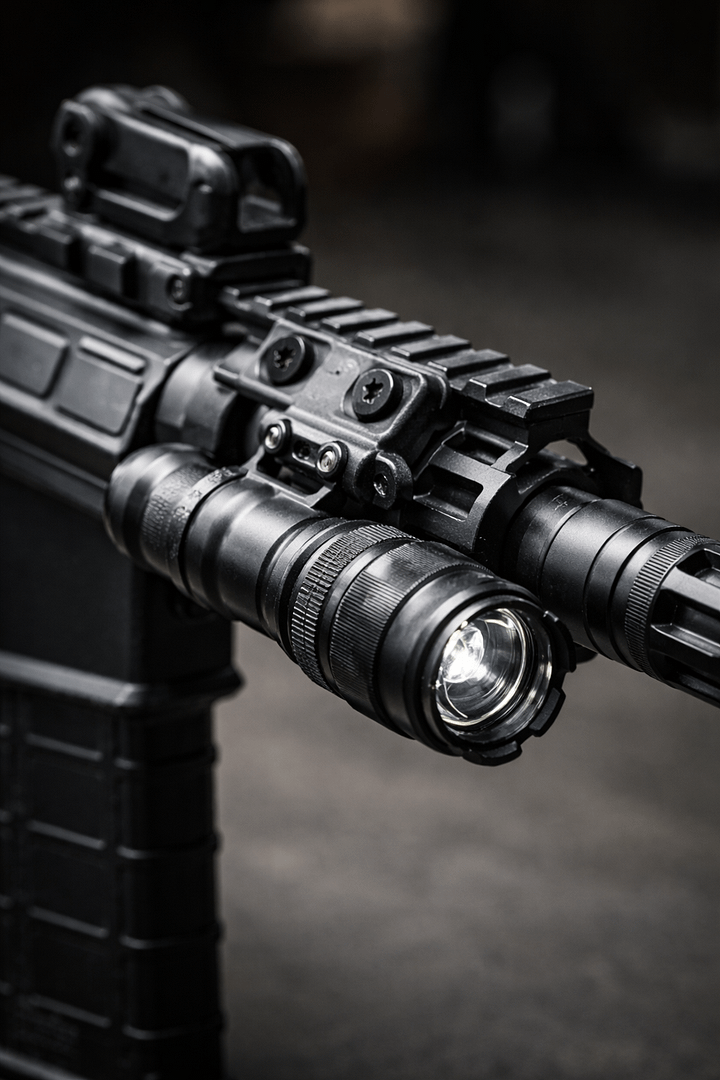
Pros & Cons — 11/1 o’clock Offset Light Mount
Beginner-friendly takeaway: If you’re not sure where to start, start at 11/1. It’s the most likely to “just work” for most people.
12 o’clock (Top Mount) — Great Control, Minimal Side Snagging
Top mounting can be very clean, especially with a pressure pad, because nothing sticks out to catch door frames.
Pros & Cons — 12 o’clock Top Mount
| Pros | Cons |
|---|---|
| Very natural activation with a top-mounted pressure pad | Can crowd optics, lasers, or front sights depending on setup |
| Low snag profile—nothing sticking far off the sides | Short handguards can feel crowded quickly |
| Often works well for ambidextrous use | Heat and blast can be harsher if mounted too far forward |
When it shines: home defense setups where you want clean lines and repeatable pressure-pad activation.

3 o’clock / 9 o’clock (Side Mount) — Traditional and Still Valid
Side mounting is common because it’s simple and compatible with lots of rails. That said, it tends to snag more than offset/top setups in tight indoor spaces.
Pros & Cons — 3/9 o’clock Side Mount
| Pros | Cons |
|---|---|
| Works with many mounts and handguards | More likely to snag on doorways and slings |
| Easy to configure for tailcap-only activation | Can increase barrel shadow depending on placement |
| Simple “classic” setup most beginners understand | Can force awkward wrist angles with some modern grips |
6 o’clock (Bottom Mount) — Usually Not Ideal Indoors
Bottom mounting exists, but it tends to interfere with prone/barricade use and often feels awkward to activate.
Pros & Cons — 6 o’clock Bottom Mount
| Pros | Cons |
|---|---|
| May work when other rail space is limited | Often awkward to activate with natural hand placement |
| Keeps top rail free for optics/sights | More interference with rests, barricades, and prone shooting |
Tailcap vs Pressure Switch (Which Mount Position Works Best?)
This is where most people get stuck—because mount position and activation method are tied together.
Tailcap-only activation
Tailcap works best when the light is placed where your thumb can naturally press the rear button—often 11/1 or sometimes 9/3, depending on your grip.
Pressure switch activation
Pressure pads often pair well with 12 o’clock or high offset mounting because your thumb rides near the top rail naturally.
Pros & Cons — Pressure Switch
| Pros | Cons |
|---|---|
| Fast activation for many modern grips | More complexity (cables, routing, retention) |
| Easy momentary control without changing grip | Can snag or fail if poorly routed |
| Pairs well with 12 o’clock and high-offset setups | Adds cost vs tailcap-only simplicity |

Pros & Cons — Tailcap Only
| Pros | Cons |
|---|---|
| Simplest and most durable setup | May require shifting grip to activate |
| No cable management needed | Less flexible for momentary-only technique |
| Lower cost and easier to troubleshoot | Harder to run from some strict 12 o’clock positions |
Room-by-Room: How Light Placement Behaves Inside a Real Home
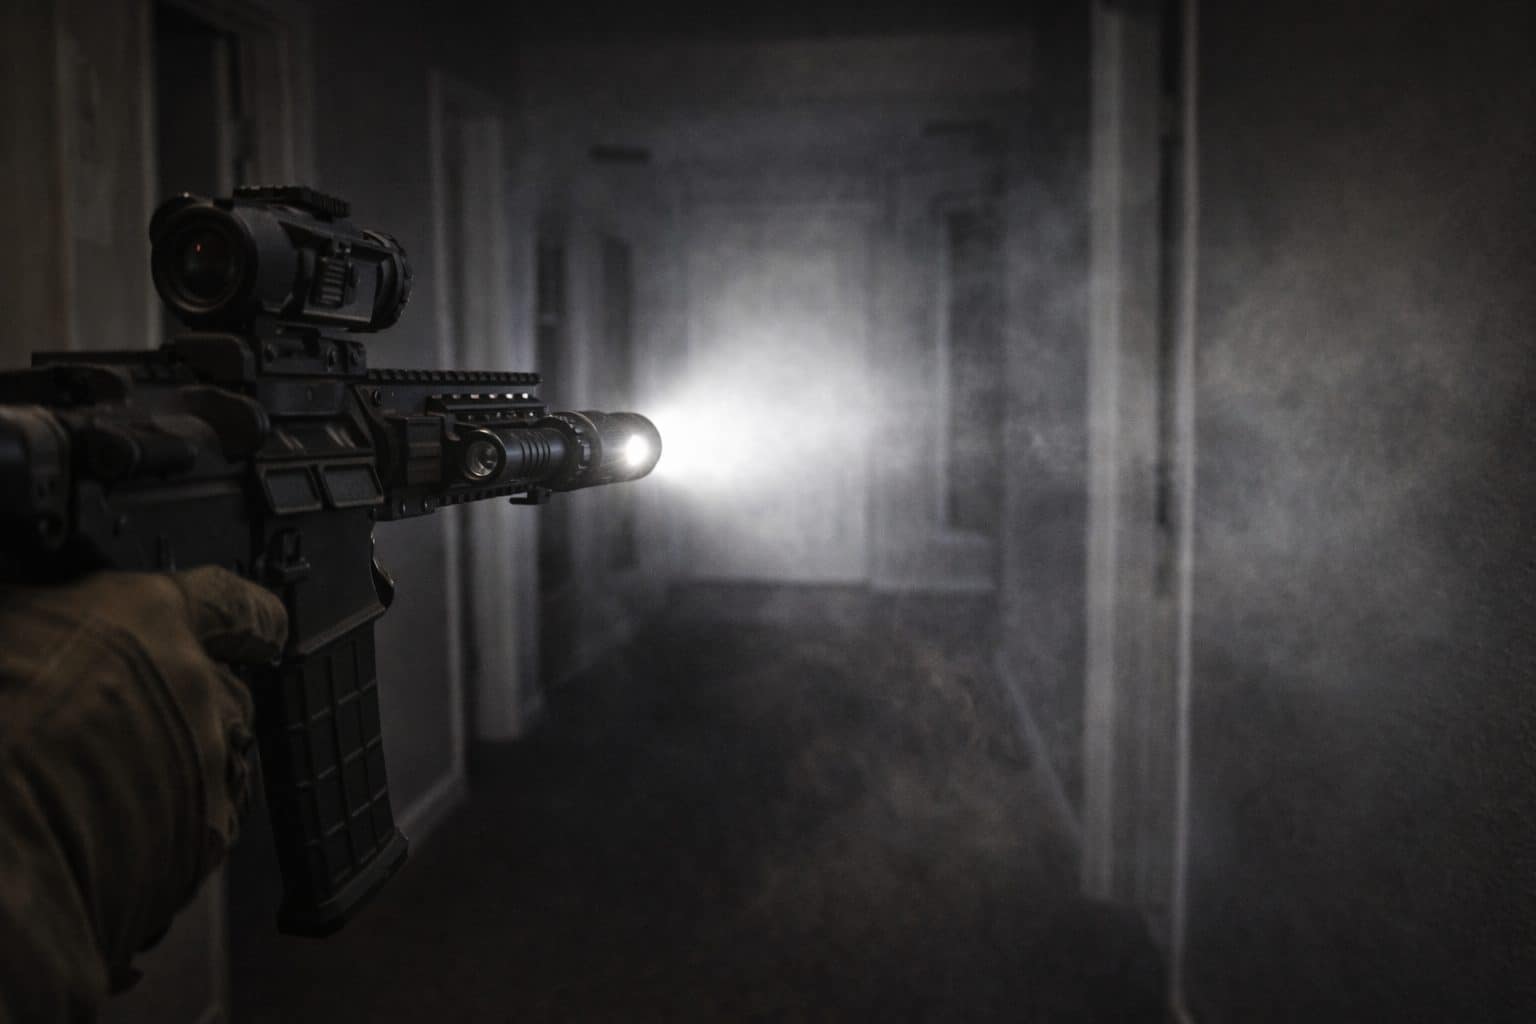
Mounting a light on an AR-15 isn’t like mounting a scope. Optics don’t bounce. Light does.
Hallways (the splashback test)
White walls + tight angles can turn an intense beam into a mirror.
What usually works best:
-
11/1 offset, or
-
12 o’clock with a well-placed pad
Doorways (the “edge reveal” test)
Doorways are where beam spill matters. A good setup gives you:
-
a clear hot spot for the far side of the room
-
spill that shows doorway edges and hands
Stairs (the shadow test)
Stairs change muzzle angle constantly, so higher light placement (11/1 or 12) often produces a more usable beam.
Open floor plans
Here, you may prefer a stronger light because of distance and ambient light—not because “more lumens is better.”
Internal link suggestion (place naturally right here):
If you want the simple breakdown of output, read: Lumens vs Candela for AR-15.
Sling Routing Changes Everything (And It’s Why Lights “Feel Wrong”)
Even a perfect mount can become annoying if your sling fights it.
The Sling-Snag Test (60 seconds):
-
shoulder the rifle
-
let the sling hang naturally
-
activate the light repeatedly
-
move around a doorway edge slowly
If the sling catches anything, fix it now—because it won’t fix itself later.
How Far Forward Should Your AR-15 Flashlight Mount Be?
A common guideline is: mount it as far forward as practical.
That advice is popular because it tends to:
-
reduce barrel shadow
-
keep light out in front of the muzzle
-
prevent your handguard from “blocking” the beam
However, forward doesn’t mean “right next to the muzzle device.”
Too close can:
-
dirty the lens faster
-
increase heat exposure
-
expose the light to more blast, especially with brakes
Suppressors, Muzzle Devices, and Why Your Light Lens Gets Filthy
If your AR is suppressed or has a brake, be a little conservative with forward placement.
Here’s the practical takeaway:
-
Mount high (11/1 or 12) to reduce tube shadow
-
Don’t sacrifice the bezel for an extra inch forward
-
Expect lens cleaning as normal maintenance
Troubleshooting: Problems, Causes, Fixes
| Problem | Likely Cause | Simple Fix |
|---|---|---|
| Light splashes back and blinds you in hallways | Beam too intense for indoors, or mount creates harsh reflections | Try 11/1 offset; practice momentary use; consider a more balanced beam |
| You miss the switch under stress | Switch isn’t where your thumb naturally rests | Move light/pad 1–2 slots; match mount position to activation method |
| Sling snags the light or cable | Cable loops or the light protrudes too far | Tighten routing; add retention points; consider offset or top mount |
| Beam has a huge shadow from barrel/suppressor | Light mounted too low or too far back | Move forward; raise to 11/1 or 12; confirm clearance |
| Top mount conflicts with sights/laser | Rail space stacking | Switch to 11/1 offset; re-space accessories |
| Lens gets dirty fast | Too close to muzzle blast or aggressive brake | Move light back slightly; clean as routine maintenance |
FAQs
You don’t need a bunch—but 4–6 FAQs are worth it because they:
-
help Yoast and Google understand intent coverage
-
capture long-tail searches
-
support FAQ schema
Here are 4 clean FAQs (not overwhelming):
1) What’s the best AR-15 flashlight mount position for home defense?
For most people, 11/1 offset is the best blend of easy activation and reduced snagging.
2) Is 12 o’clock mounting good?
Yes, especially with a pressure pad—just confirm it doesn’t crowd your optics, irons, or other top-mounted gear.
3) How far forward should I mount the light?
Forward enough to reduce shadowing—but not so far that blast and heat punish the light.
4) Do I need a pressure switch?
No. Pressure switches can be fast, but tailcap-only setups are simpler, durable, and easier for many beginners.
Final Thoughts
If you want the simplest win, start with an 11/1 offset AR-15 flashlight mount, set it forward enough to reduce shadowing, and place activation where your thumb lands naturally.
Then test it in your real environment—hallways, doorways, stairs. That’s where the truth lives. A light that feels great on a bench can feel awful in a narrow hall at 2 a.m.
Links
Streamlight ProTac Rail Mount 2
Streamlight ProTac HL-X Rifle Light Review
Lumens vs Candela for AR-15 Flash Lights
Best AR-15 Flash Lights for Home Defense