REXING B1 Mini Review: 1080p Night Vision Mini Digital Binoculars You Can Actually Carry
A human-style review of the compact infrared binoculars that record what you see—plus a complete SEO keyword + internal linking plan built for Yoast green lights.
Ethics first: Use night vision responsibly. Follow local laws, respect private property, and avoid stressing wildlife.
Quick verdict
If you want the short answer: The REXING B1 Mini is a compact digital night-vision binocular that lets you view and record nighttime scenes on a built-in screen. It uses an infrared illuminator to help you see in full darkness, and it’s designed for people who want a “grab-and-go” night viewer rather than a heavy, complicated setup.
Published highlights commonly include a 2.4-inch viewing screen, Full HD 1080p recording, a claimed up to 985 ft night viewing range, 850 nm IR illumination, and (in many bundles) a 32GB microSD card and card reader. Specifications can vary by retailer and bundle, so this guide uses official descriptions and product graphics as the baseline.
Practical take (for beginners): If your goal is to confirm what’s out there—movement on a trail, an animal near the tree line, a noise behind the shed—this kind of device is incredibly satisfying. The built-in screen makes it feel approachable. The main “mini” compromise is screen size and the fact that digital zoom can’t perform miracles at night.
What the REXING B1 Mini is
Let’s clear up a common misunderstanding right away: digital night vision binoculars are not the same thing as traditional optical binoculars. The experience is different, and understanding that difference will save you from buyer’s remorse.
What it is
- A digital viewer that uses a camera sensor (similar in concept to a phone camera) to create the image.
- An infrared-assisted night tool that can project IR light when the scene is too dark for natural light alone.
- A recorder that saves images and video so you can review, share, or document what you saw.
- A compact “carry it everywhere” unit meant for outdoors trips, quick checks, and casual night observation.
What it isn’t
- Not thermal imaging. Thermal sees heat. Digital night vision sees reflected light (including IR).
- Not premium daytime binocular glass. A sensor + screen behaves differently than high-end optical lenses.
- Not a guarantee of crystal clarity at maximum range. Range claims depend on conditions like humidity, fog, and ambient light.
Simple rule: If you want a device that helps you see and record at night, digital night vision is a great fit. If you want binoculars that feel luxurious in daylight and only occasionally help at night, you’re shopping a different category.
Specs at a glance
Below are the standout specs commonly stated in official descriptions and product graphics. These are the numbers most buyers care about first—because they translate directly to “what can I do with it?”
| Screen | 2.4-inch built-in viewing screen |
|---|---|
| Video | Full HD (1080p) recording; product graphic also shows a 1440×1080 sample overlay |
| Night range (claimed) | Up to 985 ft (≈300 m) |
| IR illuminator | 850 nm IR illuminator (built-in) |
| Magnification | Optical: 10× • Digital: 4× (per product graphic) |
| Objective lens | 25 mm (per product graphic) |
| Lens coating | FMC (Fully Multi-Coating) (per product graphic) |
| Day focus range | 6 ft to infinity (per product graphic) |
| Battery | Rechargeable built-in 2500 mAh battery (per product graphic); official listings also cite ~6 hours constant operation and longer with IR off |
| Weather rating | IP54 level (splash and dust protection; not submersible) |
| Storage | 32GB microSD included (bundle dependent) + microSD card reader (bundle dependent) |
| Weight | 9.5 oz (per product graphic) |
| Dimensions | 4.25 × 3.0 × 2.0 inches (per product graphic) |
Why the careful wording? A lot of online listings for night-vision devices mix bundle details (what’s included) with device specs (what it can do). This post separates them so readers don’t confuse “comes with a card” with “works without a card.”
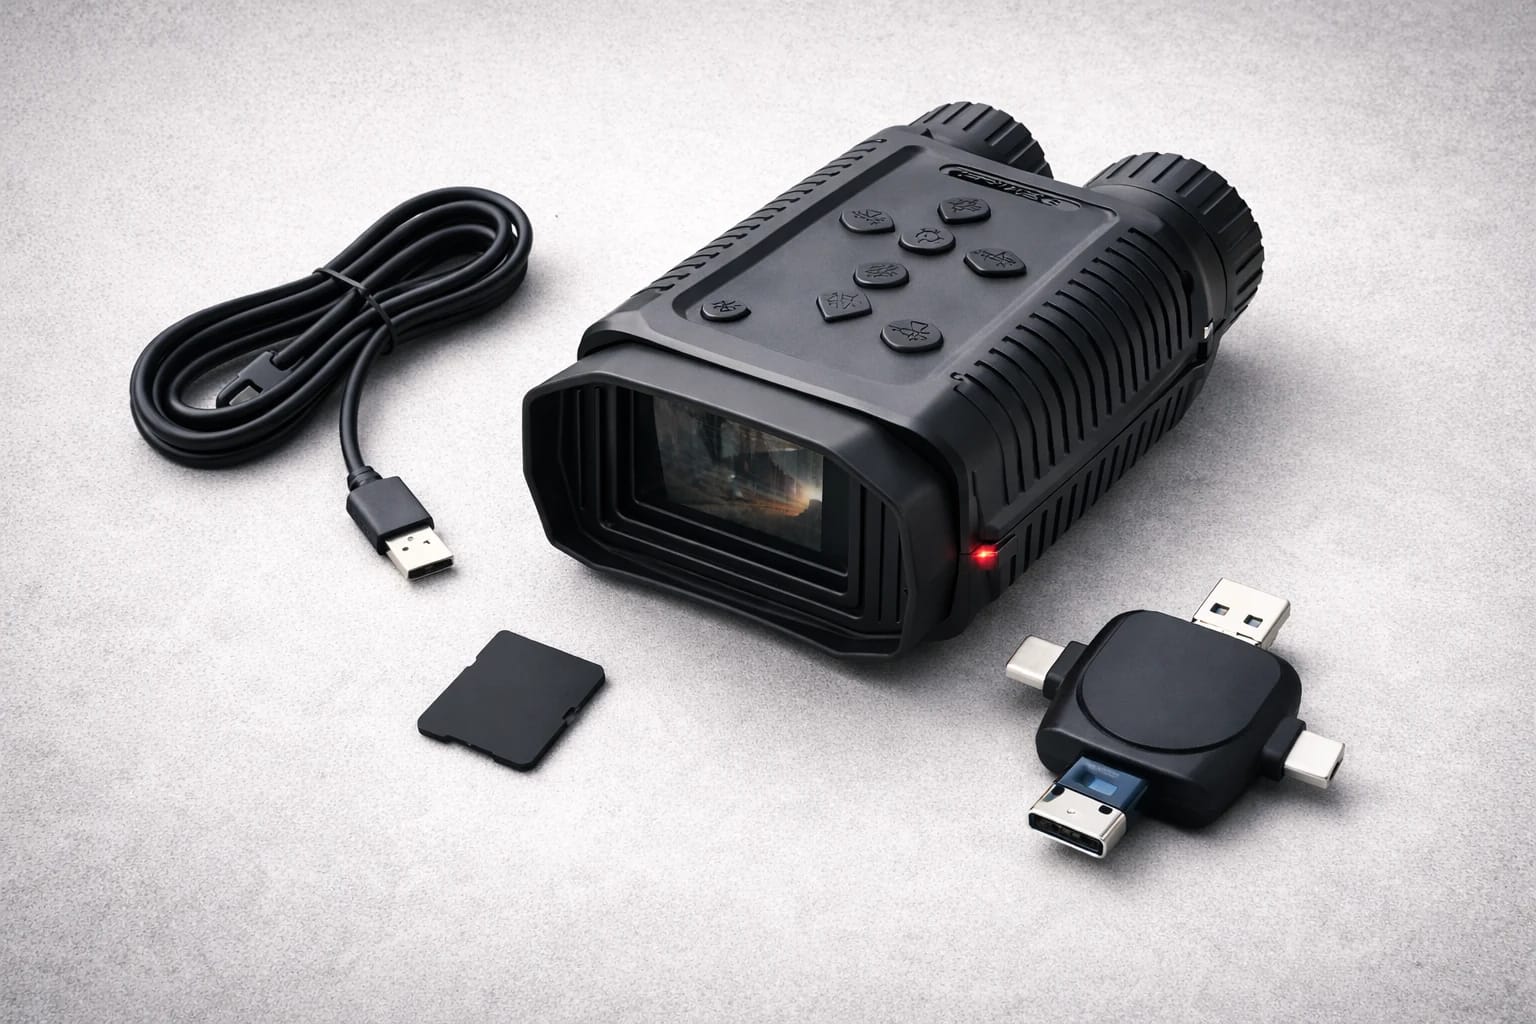
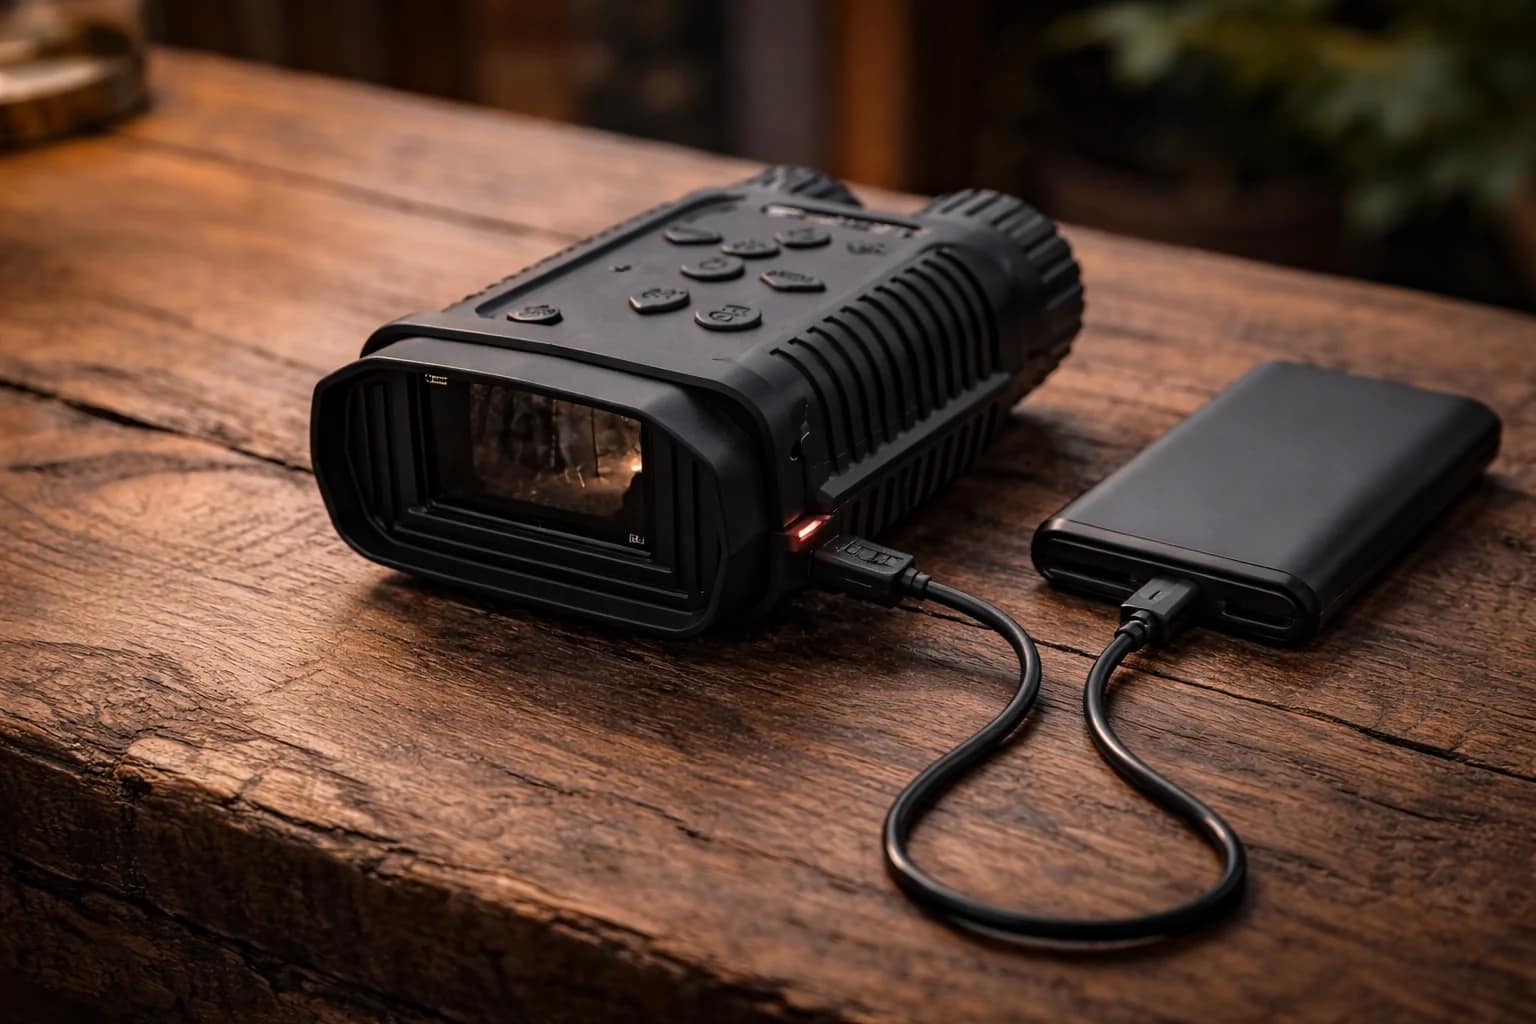
What’s in the box
Even before you turn the device on, unboxing tells you something important: how “ready-to-go” the kit is. Some buyers want a device only. Others want a full kit that saves time.
Typical “bundle” items you may see
- The REXING B1 Mini binocular device
- Charging cable (often USB-C)
- A microSD card (commonly 32GB, bundle dependent)
- A multi-connector card reader (bundle dependent)
- Basic documentation (quick start / manual)
Two things to confirm before your first outing
- Card included or not? If the listing says a card is included, great. If not, add a microSD card to your cart—because recording is half the reason to buy this.
- How do I transfer files? If you want phone-to-post workflow, confirm you have a card reader that matches your phone (USB-C or Lightning). Otherwise, plan to transfer via a computer.
Heads up: Some buyers assume “built-in screen” means “built-in storage.” It usually does not. A microSD card is typically required to save photos and video. Treat the memory card as part of the system.
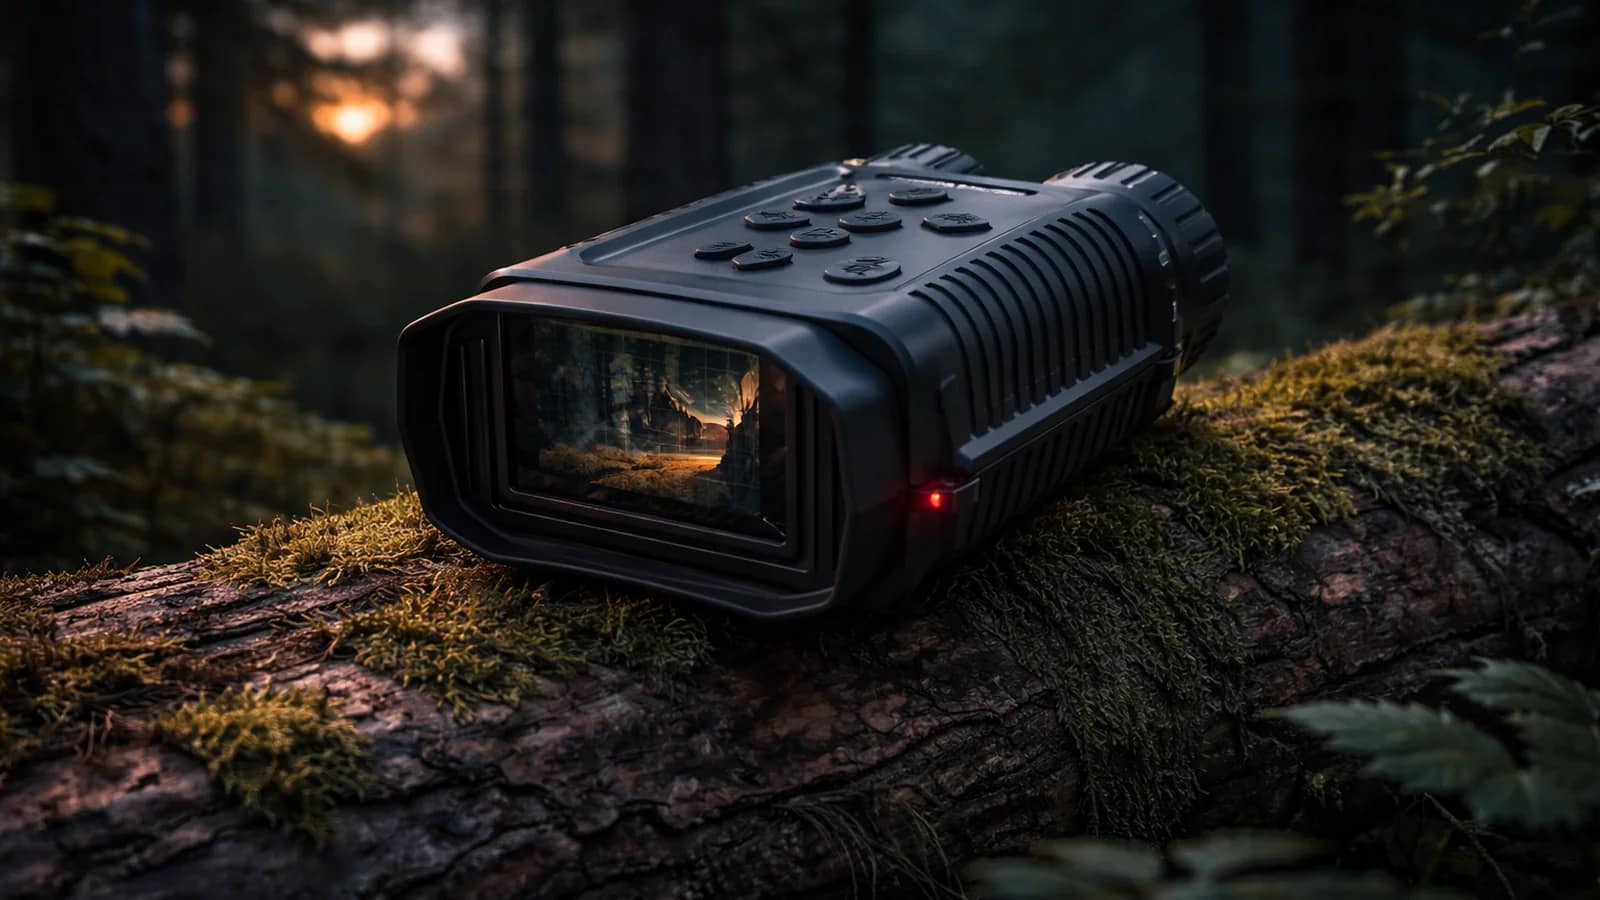
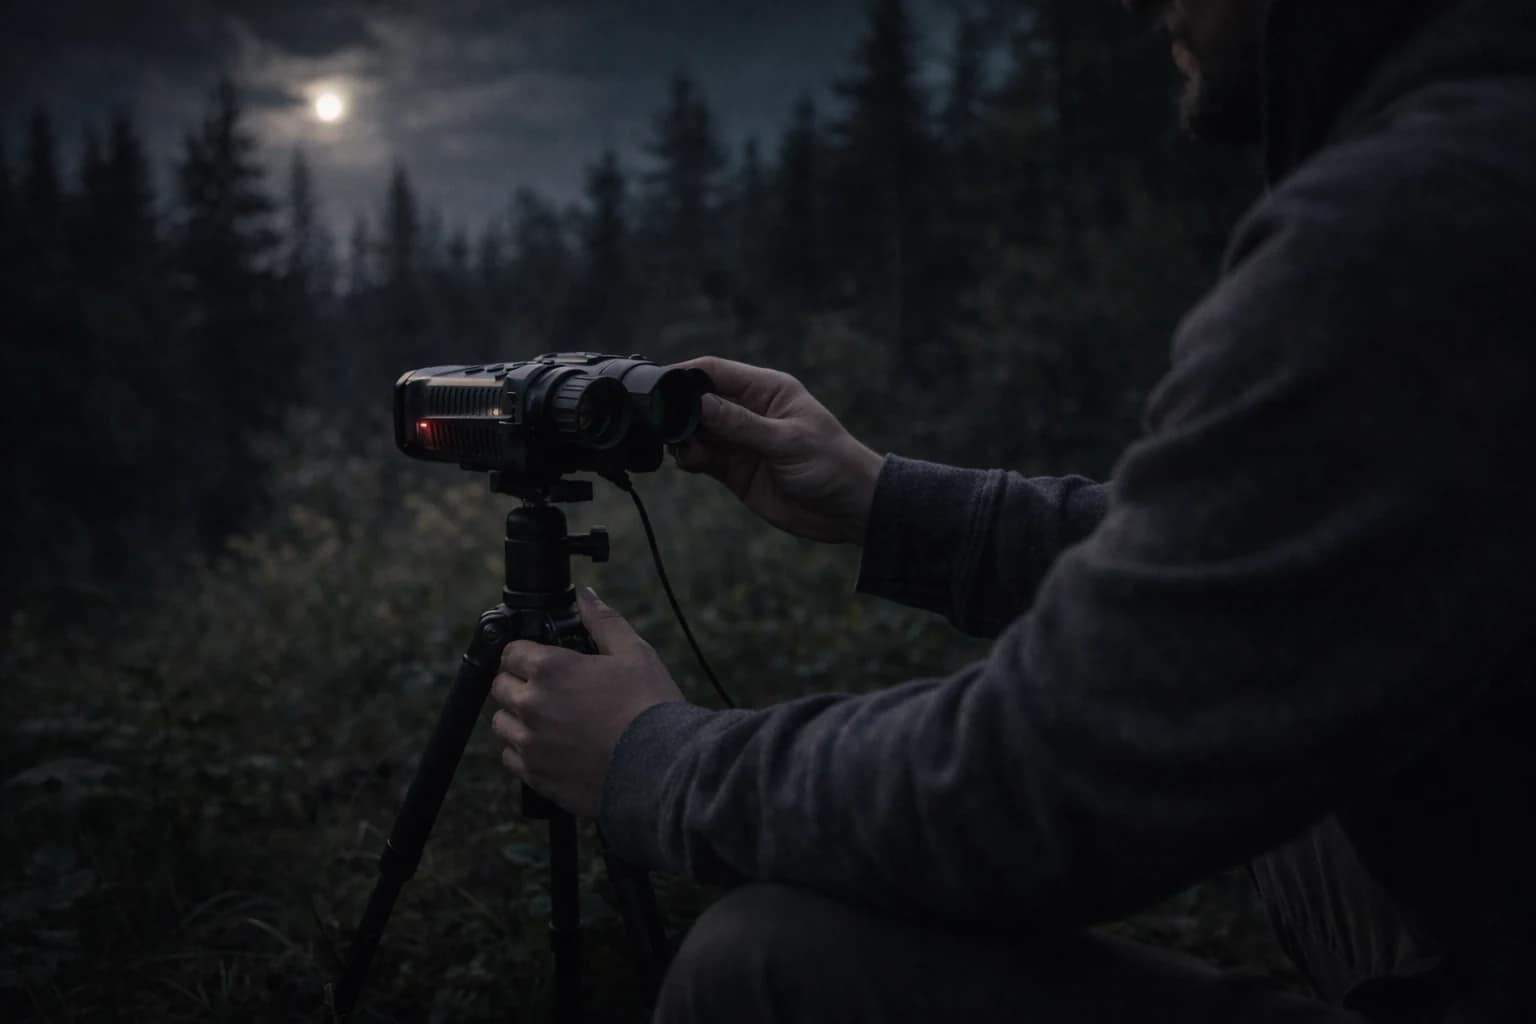
First impressions: size, grip, and “in-hand” feel
Here’s the “human” part of the review: the B1 Mini is shaped more like a compact handheld camera than like classic binoculars. That matters because it changes how you hold it, stabilize it, and interact with it in the dark.
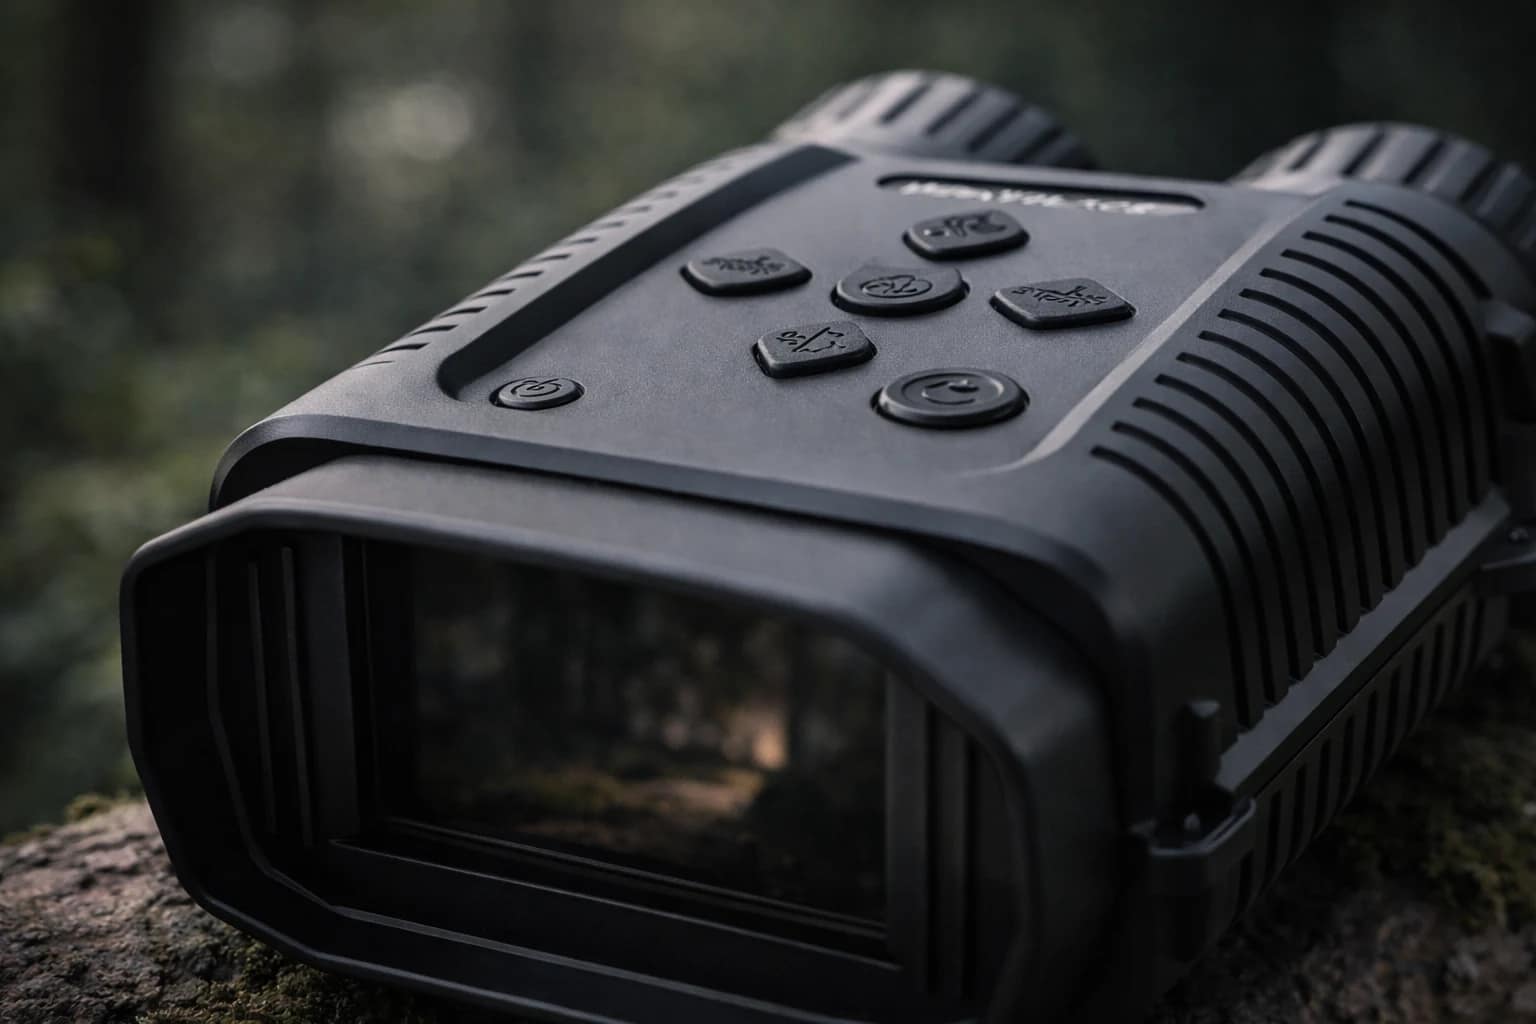
In your hand, the ribbed body looks built for grip. That ribbing is more than design—it’s the difference between a confident hold and a fumble when your fingers are cold. The device also looks like it has a slightly squared-off shape, which can help you brace it against your palm. In low light, your hands rely on shape more than sight, so a “grippy brick” is often better than a sleek slippery cylinder.
On top, the button layout is simple and deliberate. You can tell it’s meant for field use: physical buttons you can locate by feel, rather than a touch screen. When you’re scanning at night, you’re not in the mood for tiny on-screen icons. Buttons are faster.
At the rear, the screen is recessed in a hooded frame. That hood acts like built-in shade. In the real world, this helps at dusk, near campfires, or when streetlights are nearby. A small screen becomes hard to see when stray light hits it; the hood reduces that problem.
Beginner mindset shift: With classic binoculars, you “look through” the device. With digital night vision, you “operate” the device. The skill is closer to using a small camera: stabilize, focus, adjust brightness, and record.
Night vision explained
Digital night vision becomes much less mysterious when you think of it as a camera that’s optimized for darkness.
The two ingredients: sensor + infrared light
- The sensor captures whatever light is available—moonlight, starlight, reflected glow, or nearby artificial light.
- The IR illuminator adds invisible-ish light when there’s not enough ambient light to work with.
The “night vision” moment happens when those two combine: the IR illuminator floods the scene with infrared, the scene reflects it back, and the sensor displays it on the screen.
Why 850nm matters
Many consumer night-vision devices use 850 nm infrared because it can produce brighter results than more “stealth” wavelengths like 940 nm. The trade-off is that 850 nm illuminators can emit a faint visible red glow at the LED source. For wildlife watching, that glow may matter at close range. For general safety checks and scouting, it’s often a non-issue.
Digital night vision vs classic “green tube” NV
Tube-based night vision amplifies light directly in an image intensifier tube. Digital night vision captures and processes an image using a sensor, then displays it on a screen. That’s why digital devices often feel more like a camera and can offer recording and playback more naturally.
Translation: Digital night vision is a modern, screen-based approach that’s often easier for beginners. It’s also easier to share. Tube-based night vision can feel more “instant” through the eye, but it’s a different price and product category.
Feature deep dive
Now let’s break down the features the way a real buyer cares about them: what each one does for you in the field, and what it doesn’t.
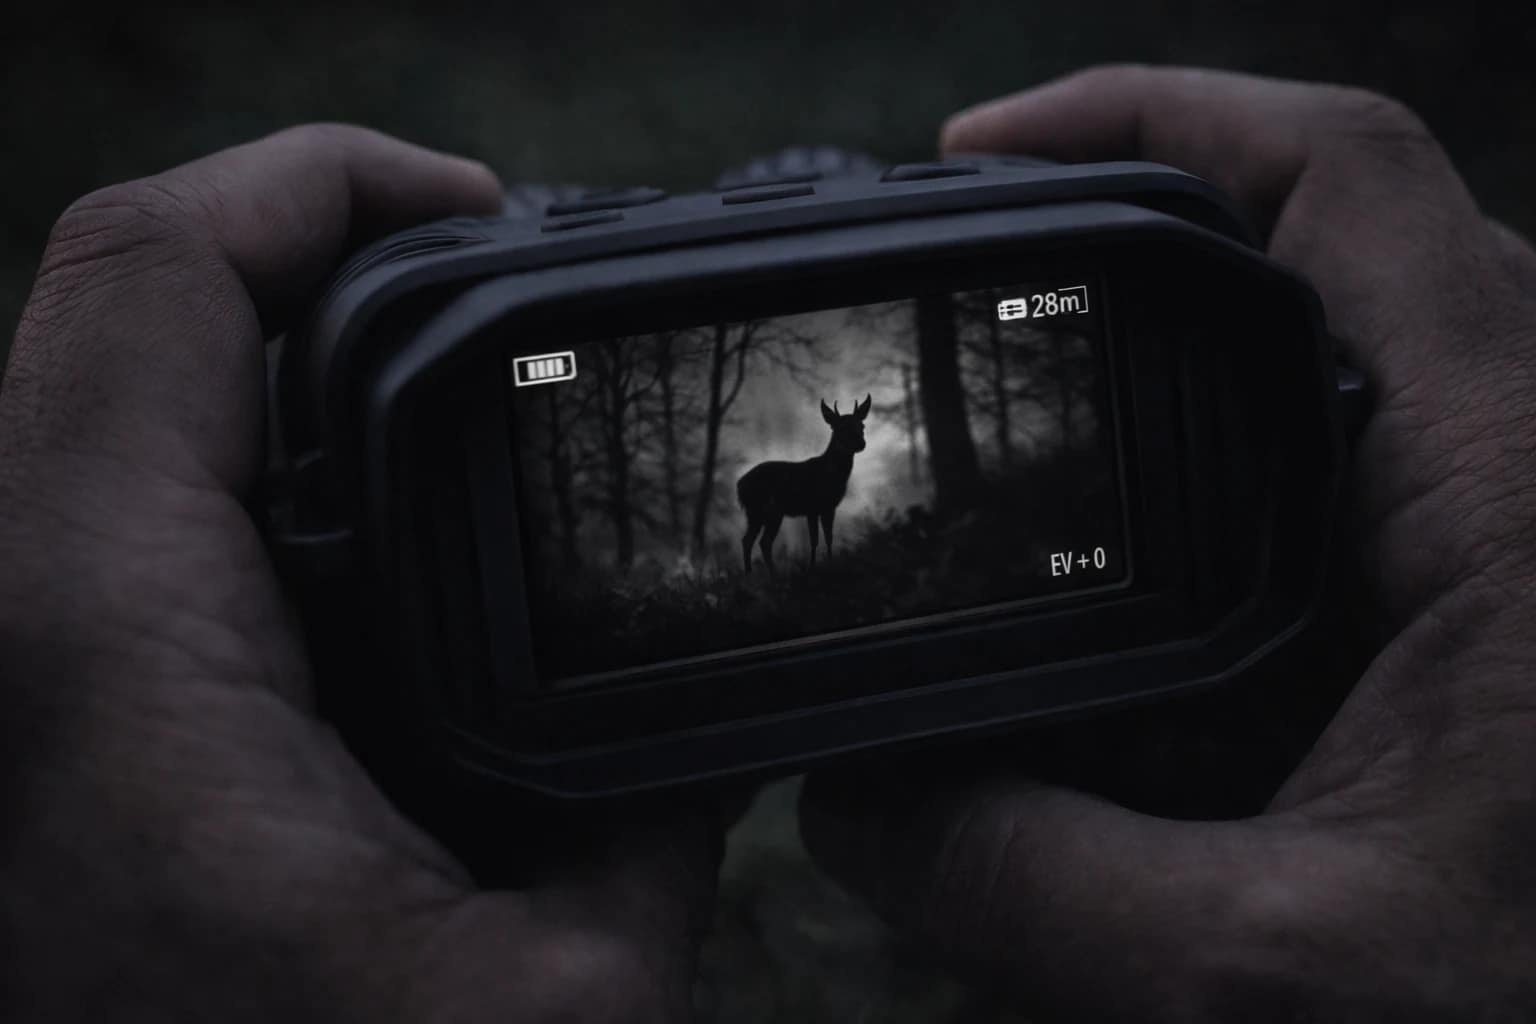
1) Built-in 2.4-inch viewing screen
This screen is the heart of the user experience. It makes the B1 Mini approachable. You turn it on, point, and watch. It’s not “screen for setup only.” It’s the primary viewfinder.
Why that matters: screen viewing makes it easier to share your observation. If you’re with a friend or a family member, you can hand the unit over and they see the same view instantly. That’s harder with traditional binoculars.
Realistic trade-off: a 2.4-inch screen is small. It’s enough to identify shapes and movement, but it’s not a big cinematic experience. Some users prefer larger screens for long sessions.
2) Full HD 1080p recording
1080p is a practical standard for outdoor content. It’s detailed enough to show what’s happening without creating massive files. Most people can upload 1080p clips easily, and most devices can play them smoothly.
Where people get disappointed: they assume “1080p” automatically means “crystal clear.” In night vision, clarity is controlled by stability, lighting conditions, and sensor limitations. 1080p helps, but it can’t overcome a shaky hand and foggy air.
3) Claimed up to 985 ft night viewing range
Range claims are best treated as “maximum possible under ideal conditions.” The practical question is: what can you see reliably in the environment you actually live in?
Here’s a more grounded way to think about range:
- Close range (0–100 ft): great for campsite checks, backyard observation, and identifying animals near the edge of your light.
- Medium range (100–400 ft): common sweet spot for spotting movement in open areas.
- Long range (400+ ft): possible in ideal conditions, but image detail depends heavily on air clarity and reflectivity.
In other words, the “985 ft” number is possible, but don’t buy this expecting to read tiny details at that distance. Think “spot and confirm,” not “count eyelashes.”
4) 850 nm IR illuminator
850 nm is popular because it tends to produce brighter images and stronger reflected IR. That’s why many consumer devices choose it: performance matters more than stealth for most buyers.
Stealth note: if you need minimal visible glow, some devices use 940 nm IR. However, 940 nm often has reduced range/brightness compared to 850 nm, depending on sensor sensitivity. For most beginners, 850 nm is a practical default.
5) Optical 10× + digital 4×
Zoom is addictive. It’s also where digital night vision can go sideways if you push it too far.
Optical zoom is generally the “good zoom.” It magnifies before the sensor image is processed. Digital zoom enlarges the pixels you already captured, which can reduce detail and emphasize noise—especially at night.
Best practice: use optical zoom for framing, then use digital zoom only when you already have a stable position and enough IR brightness.
6) Battery: built-in 2500mAh
IR illumination is the biggest battery drain. The screen is the second biggest. That’s why “battery life” varies so much between day use, low-IR night use, and full-power IR night use.
Official descriptions commonly cite around 6 hours of continuous use and a much longer run time with the IR illuminator turned off. The practical implication is simple: if you expect a long night, charge fully and consider bringing a power bank.
7) IP54 splash and dust protection
IP54 suggests protection from limited dust ingress and water splashes from any direction. That’s a solid outdoor rating for normal use: trails, light rain, dusty vehicles, and general camping life.
But: IP54 is not submersible. Avoid dropping it in water. Avoid heavy soaking. And if it does get wet, dry it properly before you store it.
8) Storage and file transfer
Many bundles include a microSD card and a card reader. That’s not a “nice-to-have.” It’s what makes this device feel modern. Without quick transfer, your footage stays trapped in a drawer.
For outdoors creators, quick transfer is also what turns a night observation into next-day content. Even if you never post, it’s helpful to review clips later to confirm what you saw.
Pro tip for creators: Create a folder on your phone called “Night Clips.” Transfer your best clips the same night. Add 1–2 lines of context. Your future self will thank you when you’re writing posts later.
Real-world use cases
The best way to judge the B1 Mini is to match it to the moments you’ll actually use it. Here are the scenarios where a compact, screen-based night viewer shines.
1) Wildlife watching without blasting the woods with a bright flashlight
Night wildlife watching is half patience, half positioning. You’re listening for movement, scanning edges, and watching for silhouettes. A compact digital unit helps because you can keep it ready without feeling like you’re hauling a brick around your neck.
- Great for: spotting deer movement, raccoon activity, nocturnal animals near a treeline
- Technique: keep IR brightness as low as possible while still seeing clearly; conserve battery and reduce visible glow
2) Beginner night scouting
Many hunters want night vision for one reason: information. They want to learn which trail is active, which field edge is being used, and what time activity peaks. That info can improve ethical daylight hunting decisions.
Local laws vary. Always confirm what’s legal in your area. Use night vision ethically and responsibly.
3) Camping and nighttime reassurance
Camping isn’t always quiet. Branches snap. Footsteps happen. And your brain loves to invent stories. A night viewer helps you replace imagination with information. You can check a noise calmly without sweeping a bright beam through the trees.
4) Property and farm checks
If you live in a rural area, night checks are a normal part of life: gates, fences, sheds, animals, and the occasional “what was that?” A screen-based night viewer is useful because you can check quickly and record if needed.
5) Outdoors content creation
Night content is rare because it’s hard to capture. A device that records what you see removes that barrier. It won’t replace professional cameras, but it can capture fascinating behavior and scenes that a phone struggles with after dark.
Beginner setup: from box to first clip
This section is written for the person who just opened the box and wants a smooth first experience.
Step 1: Charge it before you judge it
Charge the device fully the first time. Low battery can reduce brightness and create a “this looks worse than I expected” first impression.
Step 2: Insert a microSD card
If your bundle includes a card, insert it now. If not, use a quality microSD card and format it in-device if a format option exists. This reduces file corruption risk.
Step 3: Learn three actions that matter in the dark
- Power — turning on/off without looking
- Mode — switching between photo and video
- IR brightness — adjusting for the scene
When it’s dark, you don’t want to “learn.” You want muscle memory.
Step 4: Start at dusk (not in total darkness)
Your first session should be at twilight. You’ll see more detail, you’ll learn focus behavior, and you’ll understand the interface before you’re staring at a black screen wondering if something is wrong.
Step 5: Record a 10-second test clip and replay it
This confirms the basics: recording works, the card works, and you can find playback easily.
Step 6: Transfer one file to your phone or computer
If your kit includes a card reader, do a quick transfer now. If not, test transfer via your computer. This is a “day one” step because it prevents frustration later.
Beginner win: Once you can record, replay, and transfer, the device becomes useful immediately. Everything after that is about improving technique.
Field scenarios: what to expect in different conditions
This is the section that saves new buyers the most frustration. Night vision is affected by the environment more than most gear. Here’s what changes from night to night.
Scenario A: Clear night with some moonlight
This is the “best case” for digital night vision. There’s enough ambient light to give the sensor detail, and the IR illuminator doesn’t have to work as hard. You’ll often see better contrast and less noise. If you’re judging the B1 Mini for the first time, do it on a clear night like this.
Scenario B: Pitch black in dense woods
Here, the IR illuminator does the heavy lifting. You may need to increase IR brightness. You may also notice that reflective leaves and wet bark can create bright spots that look like “wash.” It’s normal. Reduce IR slightly and adjust your angle if needed.
Scenario C: Fog, mist, or drizzle
Fog is a night vision spoiler. IR light scatters in water droplets, which can make the scene look like glowing haze. In this condition:
- reduce IR brightness to cut backscatter
- shorten your expectations (closer range works better)
- stabilize carefully (noise is more visible in haze)
Scenario D: Near streetlights or campfires
Bright light sources can cause glare and reduce contrast. A recessed screen hood helps, but the best fix is position: angle away from direct light, or move behind a barrier (tree, post) that blocks glare.
Scenario E: Open fields
Open fields are where range claims feel most believable. There’s less clutter, less reflectivity, and silhouettes stand out. If your use case is “spot animals at the edge of a field,” this is a strong environment for the B1 Mini-style device.
Reality check: If a night-vision device looks “meh” in fog and amazing in clear air, that’s not a defect. That’s physics.

How to get clearer night footage
Night vision is like fishing or archery: the gear helps, but technique makes it look professional. These are the high-ROI tips that make the biggest difference.
1) Stabilize first, zoom second
If your footage looks soft, the first fix is not “more zoom.” It’s stability. Use this upgrade ladder:
- brace elbows against your ribs
- lean into a tree or wall
- rest the device on a fencepost or backpack
- use a small tripod or monopod
2) Use the lowest IR level that still works
Higher IR brightness can improve visibility, but it can also create “wash” in reflective scenes (wet leaves, shiny surfaces). Start low. Increase only when the scene demands it.
3) Let your eyes rest
A bright screen at night can fatigue your eyes. Reduce screen brightness when possible. Your comfort matters, especially on long sessions.
4) Focus on silhouette and behavior
At night, the goal is often identification through shape and movement. Gait, head shape, ear height, tail movement—these clues matter more than fine fur detail.
5) Record short clips and label them
Short clips are easier to review and share. A simple note system turns random footage into usable content:
- 2026-01-31 • West treeline • deer • 40 sec
- 2026-01-31 • Creek path • raccoon • 12 sec
- 2026-02-02 • Back pasture • coyotes • 18 sec
6) Think like a storyteller
When you record, capture context: the path, the tree line, then the animal. A 20-second clip with context tells a better story than a shaky 5-second close-up.
Care, storage, and long-term reliability habits
Most night-vision devices fail from two causes: moisture and neglect. You don’t need a complicated routine. You need consistent habits.
After-use routine (2 minutes)
- Wipe the body down with a dry cloth if it’s damp or dusty
- Let it air out for 20–30 minutes before sealing it in a case
- Recharge it if you used IR heavily
- Back up your best clips to a computer or cloud folder
Lens care
Use a lens cloth. Avoid wiping lenses with your shirt if it’s gritty. Scratches reduce contrast—especially at night.
Storage tips
- Store in a dry place (avoid hot cars for long periods)
- If you live in a humid region, add a small silica gel pack to the case
- Don’t store with a nearly-dead battery for months; recharge to a safe level
Simple rule: Dry before you store. Most electronic gear lasts longer when it doesn’t live in trapped humidity.
Troubleshooting common problems
Problem: “I can’t see anything at night.”
- Confirm night mode is active and the IR illuminator is turned on
- Increase IR brightness gradually
- Check if you’re aiming through fog/mist; reduce IR and shorten range expectations
- Start at dusk to confirm the device works before judging “full dark” performance
Problem: “The image looks washed out or glary.”
- Lower IR brightness (especially if leaves are wet)
- Change your angle to reduce reflections
- Move away from direct streetlight or campfire glare
Problem: “Recording fails or files won’t play.”
- Format the microSD card in the device (back up first)
- Use a reputable card; extremely cheap cards can cause errors
- Confirm the card is inserted fully and locked into place
Problem: “Battery dies faster than expected.”
- IR illumination drains battery quickly; lower IR when you can
- Reduce screen brightness
- Use auto shut-off if available
Safety note: Avoid pointing infrared illumination at people’s eyes at close range. Treat it like a flashlight—just because it’s “invisible” doesn’t mean it’s harmless.
Pros & cons
| ✅ Pros (green) | ⚠️ Cons (red) |
|---|---|
|
|
The “cons” aren’t deal-breakers for the right buyer; they’re the normal trade-offs of a compact, screen-first digital night vision device.
Who should buy it
Buy it if…
- You want a portable night viewer you’ll actually carry.
- You want to record and replay without extra gear.
- You’re a beginner and want a simple workflow with a built-in screen.
- You want a tool for wildlife watching, camping, or property checks.
Skip it if…
- You want premium daytime binocular performance for birding.
- You need professional identification at long range.
- You strongly prefer “through-the-eyes” viewing over a screen.
- You want thermal imaging (this is not thermal).
To make this decision easier, ask yourself one question: Do I want a night viewer, or do I want binoculars that happen to work at night? The B1 Mini is firmly in the first category.
Buyer’s checklist: pick the right night vision for your needs
If you’re comparing multiple devices, use this checklist to avoid “spec sheet traps.” These are the questions that matter in the real world.
Use case questions
- Do I want this mainly for wildlife, hunting scouting, camping safety, or property checks?
- Will I use it mostly in open fields or dense woods?
- How often will I use it in fog/mist conditions?
- Do I need to share the view with others? (Screen helps.)
Performance questions
- How important is screen size for comfort?
- Do I need recording and easy transfer, or is viewing enough?
- Do I need long range, or is “confirm and observe” enough?
- Is 850nm IR okay for my environment, or do I need a stealthier IR approach?
Workflow questions
- Do I have the right microSD card and card reader?
- Will I label footage and store it, or will it get lost?
- Do I want a simple “turn on and go” device, or am I okay with a learning curve?
Why this matters: Most disappointment comes from mismatched expectations, not bad gear. Buying the right category for your needs is the real win.
FAQ
Is 1080p “enough” for night vision?
For most people, yes. 1080p is Full HD and widely supported. In night vision, stability and conditions often matter more than raw resolution.
Does 850 nm IR scare animals?
It depends on the animal and distance. 850 nm illuminators can emit a faint red glow at the source, which some wildlife may notice. A practical approach is to use the lowest IR brightness that still works.
Can I use it in the rain?
An IP54 level suggests splash resistance, which typically covers light rain. It is not submersible. Dry it before storage.
Is this the same as thermal imaging?
No. Thermal detects heat signatures. Digital night vision uses reflected light (including IR) to form an image.
What’s the best way to get steady footage?
Brace elbows, use a tree/post, or use a mini tripod. Stability is the fastest quality upgrade.
Can I transfer files to my phone?
If your bundle includes a multi-connector card reader, yes. Otherwise, transfer via a computer with a microSD reader.
Final words
If you want a compact night vision viewer that’s easy to operate and can save photos and video, the REXING B1 Mini checks the right boxes. Just remember: night clarity comes from stability + sensible IR use as much as it comes from specs.
Next step: decide where you’ll use it most—open fields, dense woods, or around property—and build your setup around that. A simple mini tripod and a reliable microSD workflow can upgrade your results immediately.